I’m currently, more than ever, painting in oils very often and that’s why I am sharing many blog posts about it. Painting skin tones in oil paint can be challenging, especially for beginners, but it can also be a very rewarding process. In this article, I will be sharing everything you might need about painting skin tones in oil paint including the best art supplies to use, expert tips to help you achieve more realistic and natural-looking skin tones in your oil paintings as well as art masters to follow as an example.
Other posts you might find interesting in this matter:
How to pick your Oil Paint Mediums as a beginner? +Bonus Techniques
How to know the right Paintbrush to pick as an artist?
Disclosure: This blog post may contain affiliate links, which means I may receive a commission if you purchase the products I recommend. While purchasing the products I recommend won’t cost you any extra money, they will help me keep this blog up and running. Thank you for your support!
1- The art supplies that will help you paint realistic skin tones in oil paint
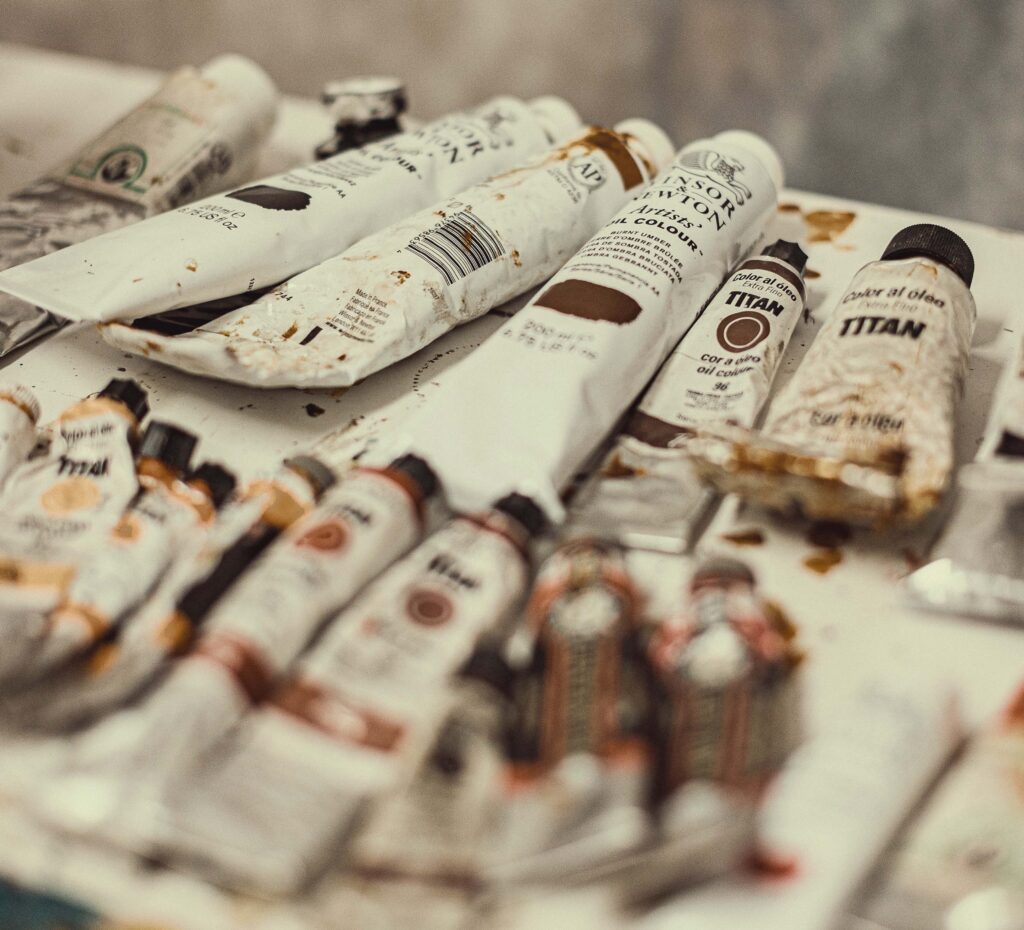
As someone who’ve been painting portraits for years, I can tell you that using the right art supplies can make a significant difference when it comes to painting skin tones, especially in oil paint. And the most important art supplies that will help you paint better skin tones got to be:
High-quality oil paints
Using high-quality oil paints is essential when painting skin tones. Look for paints that have a high pigment concentration, as this will allow you to achieve more vibrant and saturated colors. Brands such as Winsor & Newton, Gamblin, and Old Holland are known for their high-quality oil paints.
Palette knife
When mixing oil paint shades for skin tones, using a palette knife is so much better than using a brush. Using a palette knife helps you achieve more precise color mixes and create smoother, more even paint surfaces.
Soft-bristle brushes
Soft-bristle brushes, such as sable brushes, are ideal for painting skin tones. They allow you to blend colors more smoothly and create subtle variations in color and value. Look for brushes that have a good balance between stiffness and flexibility, such as those made by Rosemary & Co.
Gessoed painting surface
Using a gessoed painting surface can help ensure that your paint adheres well and provides an even surface to work on. Gesso also prevents the oil in the paint from seeping into the canvas or panel, which can cause discoloration over time.
Solvent
Solvents such as turpentine or mineral spirits can be used to thin oil paint and clean brushes. Using solvent can help you achieve more subtle and nuanced color variations and create smoother paint surfaces.
Medium
A painting medium such as linseed oil or stand oil can be used to thin paint and create a more flowing consistency. Adding medium can help you achieve a more luminous quality in your skin tones and make it easier to blend colors.
2- Expert tips on achieving more realistic and natural-looking skin tones in your oil paintings
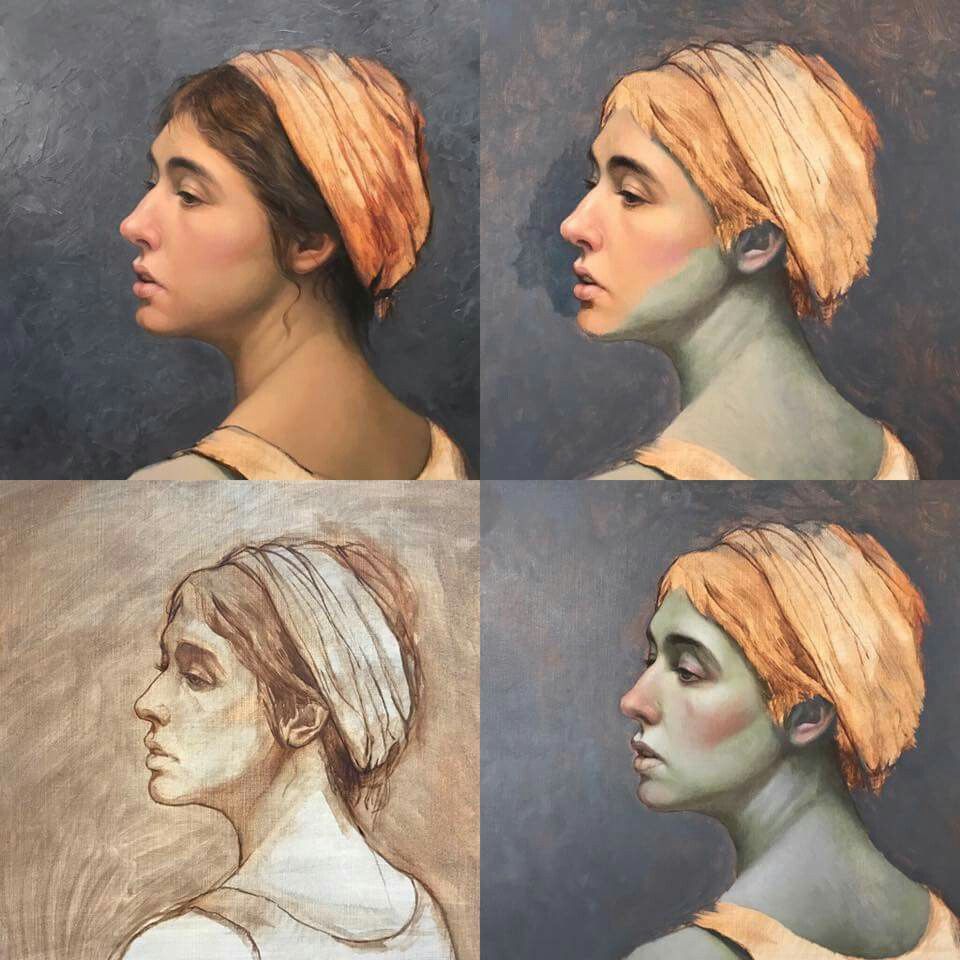
Start with a good base color
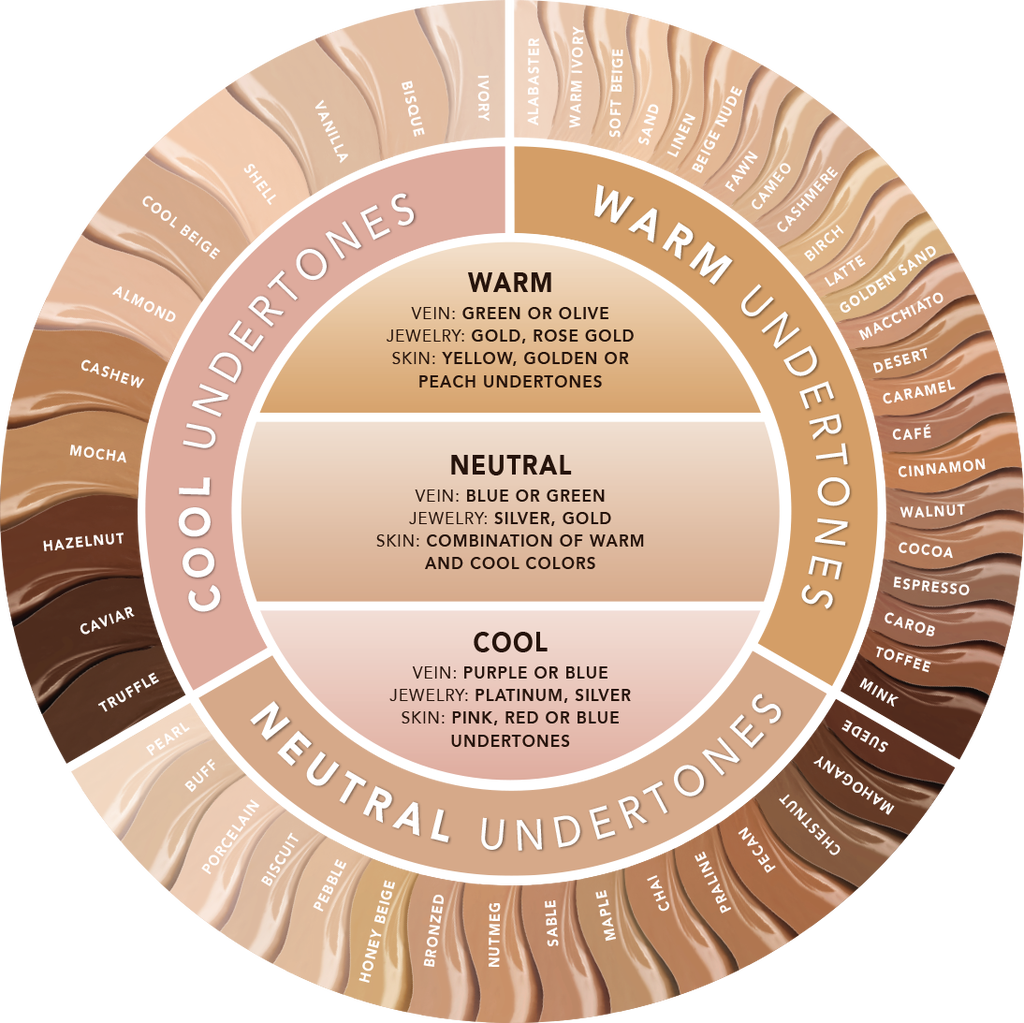
Mix your base color using a combination of white, yellow ochre, and burnt sienna. Adjust the ratios of each color until you achieve a base color that closely matches the overall tone of the skin you are painting. (You may need to learn a little bit about skin undertones and color warmth before you master the underpainting and base color choices).
Observe and study skin tones
Take time to observe the skin tones of people around you and study the colors and values you see. Pay attention to the way the light falls on the skin and how it affects its color and value.
Use a limited palette
Use a limited palette of colors to keep your skin tones consistent and cohesive. Some essential colors include white, yellow ochre, burnt sienna, cadmium red, and ultramarine blue.
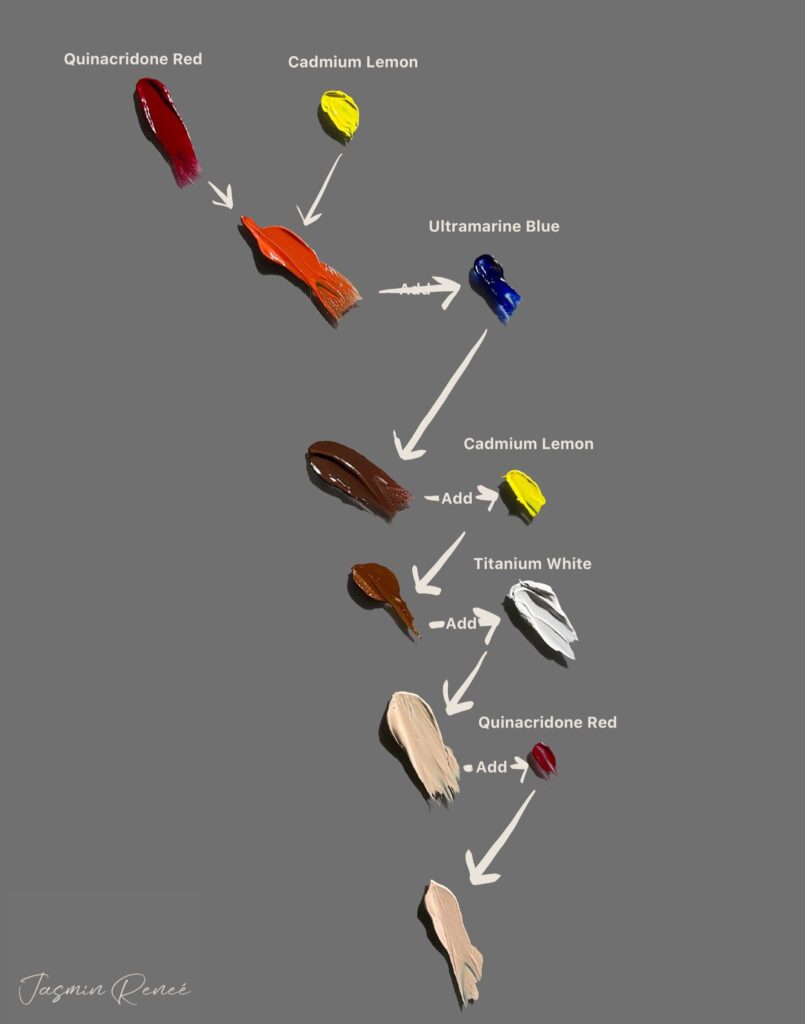
Mix colors carefully
Again, use a palette knife instead of a brush. When mixing colors, start with small amounts and gradually add more color until you achieve the desired shade. Remember, it’s easier to add color than to take it away, so work slowly and carefully. Always mix on your palette NOT in your canvas! I know it’s tempting but if you don’t want your colors to turn muddy and ugly, mix your paint in the palette instead of the canvas.
Use thin layers of paint
Build up your skin tones slowly using thin layers of paint. This will allow you to adjust the color and value gradually and prevent your painting from becoming too heavy or muddy.
Pay attention to values
Pay close attention to the value (lightness or darkness) of the skin tones you are painting. Skin tones can vary greatly in value, so it’s important to get this right to create a realistic and convincing painting.
Add details and highlights last
Add details, especially highlights, and things like wrinkles last. This will help bring your painting to life and make it more realistic without mudding your colors.
Remember, painting skin tones in oil paint takes practice and patience. Don’t be afraid to make mistakes and keep experimenting until you achieve the results you want.
Master painters that you can use as a reference to practice painting skin tones in oil paint
- Rembrandt
I personally love Rembrandt’s work and besides him being widely regarded as one of the greatest painters of all time, he is known particularly when it comes to painting portraits. His use of light and shadow to create realistic and expressive skin tones is unparalleled.
- John Singer Sargent
Sargent was an American painter who is famous for his portraits of high society figures. He was a master at capturing the delicate nuances of skin tones and the effects of light on the skin.
- Titian
Titian was an Italian painter who is known for his use of color and his ability to create rich, glowing skin tones. His portraits of women, in particular, are notable for their sensual and luminous quality.
Studying the works of these great masters can provide valuable insights into the techniques and strategies they used to achieve realistic and expressive skin tones in their paintings.
Conclusion
I hope you find what you’re looking for in this article. Let me know in the comments or through my social media channels what are some of your concerns when it comes to painting. Enjoy creating <3
Very useful hints
Thank you for sharing these valuable tips on achieving realistic skin tones in oil painting! As a beginner, I found this article incredibly helpful and informative. The step-by-step approach and practical advice make it easier to grasp the nuances of skin tones in painting. Can’t wait to apply these tips to my own artwork. Tristian