Did you know that your art-making process determines the outcome of your creations?
In this article, I will tell you what’s wrong with your art-making process and how you can fix that. How are we supposed to approach our art-making process so we can make the best out of our side projects and creative endeavors?
To share with you how I personally shape my routine to balance my office job, my studies, my side projects, and my art rituals, I decided to write this quick guide to shed light on a few tips that I believe would be helpful, but keep in mind that what I do is by no means perfect.
To start making art, I realized that we needed to go through different stages: an open mode and a closed mode.
When I was young, I only worked in a closed mode because the majority of creators, artists, and creatives that I knew and followed tended to work often in a closed mode, but later I realized, my way of approaching my creative endeavor wasn’t quite right. So let me show you what I did and what ended up working for me.
The two main stages of making art: OPEN MODE VS. CLOSED MODE
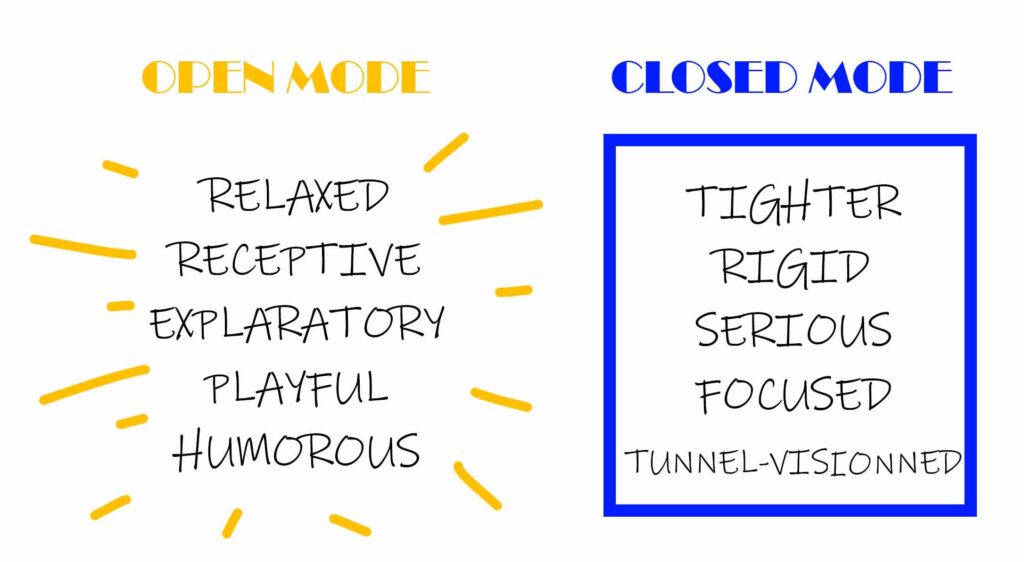
The first stage of making art is when we don’t have the idea yet! Maybe looking for pieces of inspiration, observing how things around us are, and just being in an overall state of receptiveness. This is what I call an open mode! Often, artists sit in their computers, room, or office looking for inspiration; when in fact, an open mode should be fully open even in its physical environment.
The closed mode of creating on the other hand is where most people spend their time. It’s when you’re really focusing on the creative task or art making, it’s the way to get things done and developed to produce a finished product or creation.
So with that being said, how do we approach both stages of making art?
The open stage of creating art
In a previous article, Generate unlimited ideas for your artworks with this method… I shared with you my way of turning a word into a piece of art. And I want you to follow the same method to work on any other creative side project but with a more open and receptive spirit this time.
I want you to stop looking for inspiration inside and instead pack your sketchbook and leave your home and mental comfort zone. I have this little activity that I did with kids when I used to train them to develop soft skills, and I really think it’s fun and effective.
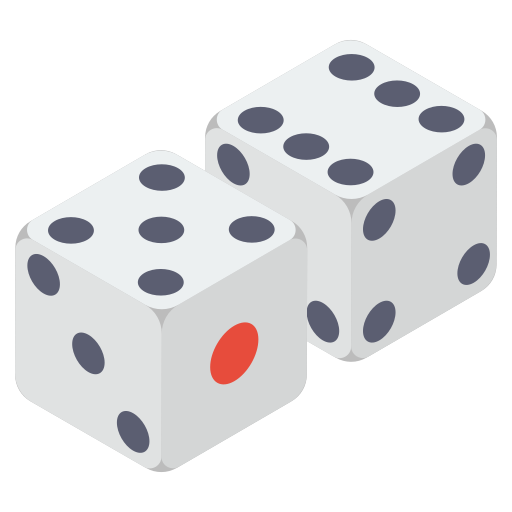
1- Get started
Take two dice and roll them. Then, you sum the numbers you got. In this, it’s 5+6 so our addition is 11. You will take your sketchbook with you, and walk/drive/take the bus or whatever you choose to do, and count 11 minutes, once the time is up. Stop! Wherever you are, that’s the place where you’ll be spending the next hour. Use this area to mindfully find inspiration, draw the elements that catch your attention, sketch the shapes you see, and write in words what you see even if you’ve been to that place multiple times before. You just need to be in that area consciously gathering inspiration to use in your process of creation.
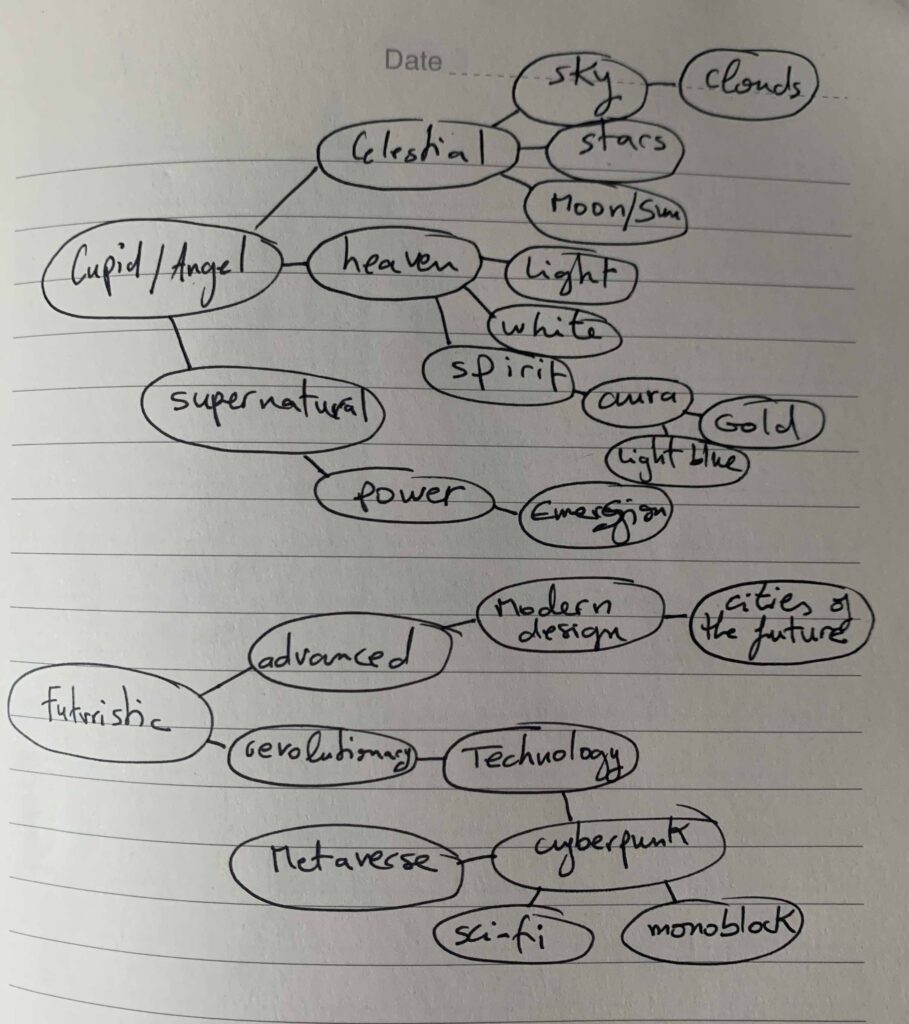
2- Mind mapping
After gathering and noting down what might have caught your eye and while you’re still in a receptive state of mind, you can either make those mental images and written notes into a list of 20 words or draw them like a map. If you’re not used to these kinds of activities, it might take you a lot of time but I assure you that it will eventually happen.
Our minds work like this: they get rid of boring ideas first, then come up with fun creative things later on. So give yourself the time it needs to escape the boring part.
3- Viewfinder
You are still out, and you have enough data to start imagining a project or at least an idea of something to be made. If you are painting, illustrating, or doing something digital, this will be very helpful to you because it helps define both perspective and composition before you move to the closed mode of creating art.
Cut a piece of cardboard into the shape of a picture frame. Move with it around, and try to find some inspiration in your surrounding. Look for interesting compositions by isolating some parts of the scene. This allows you to blur most of the scene and move slowly along the process of defining an idea for your artwork or any creative task you choose to do.
(image)
4- Create something using the elements you gathered
You’re out still, but less receptive than you were during the previous stages. Use a different sketchbook so you don’t have to keep flipping back and forth on your pages. Copy the ideas you want to explore. Try to make a concept out of what you observed.
Time to move to the closed mode of creating art
Now it’s time to work on your idea like you normally would. Explore it mentally, trace it again, use your medium, and work on what you obtained from your open mode without adding any new ideas in. Focus on staying in the closed mode and work your way to fixing your sketch/artwork/design.
If you are drawing, flip your work upside down and see what doesn’t match your desired outcome. You want to fix all the details and make your work cohesive.
A mistake to avoid in this stage of creating art
Many visual artists may make the mistake of wanting to make an artwork interesting, so they give the viewer so many things to look at. These elements you are adding are great, but sometimes they go too far and push the work to be out of balance. Avoid saturating your work with concepts.
For artists who draw, paint, design, or do photography, this article will help you keep your artworks balanced and harmonious: What is composition and why does it matter so much in art?
Conclusion
Little notes to keep in mind when you’re creating art:
- Our eyes follow the hierarchy of looking at things from left to right (it happens because we’re wired to read from left to right, for those who do it). If you are an arab and used to writing from right to left, your eyes will follow that hierarchy.
- Make sure that nothing is making the eyes of the viewer stuck in one place
- Communicate your ideas through simple concepts.
I really appreciate your approach and how you use the dice to randomly wander somewhere where we can surely find an inspiration <3<3
Thankful for your lovely feedback <3