If you’ve ever sat down to draw a face and nailed the first eye, only to find yourself struggling to get the second one to match, you’re not alone! For many beginners, figuring out how to draw the other eye is a major hurdle. But don’t worry! With a few practical tips and a little patience, you’ll be on your way to creating perfectly symmetrical faces in no time.
If you are new to drawing, check out my drawing guide for beginners.
1. Measure and Map Out the Face
Symmetry starts with solid foundations. Before diving into the details of the eyes, it’s important to map out the structure of the face. Here’s how:
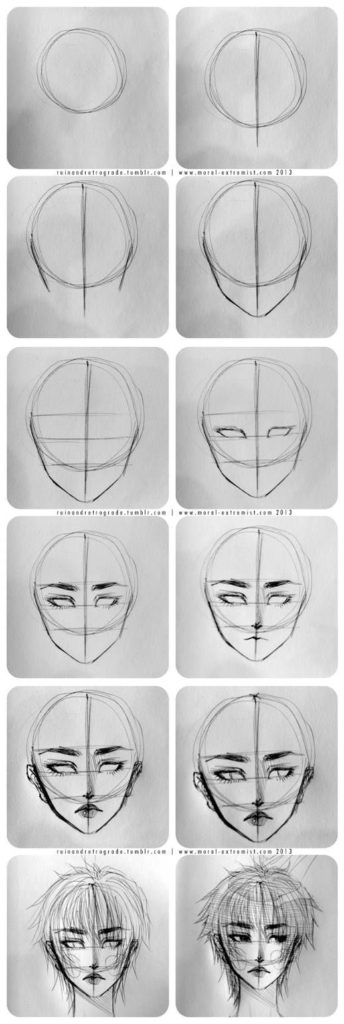
- Start by drawing a vertical line down the middle of the face. This will act as a guideline to ensure that both sides of the face are balanced.
- Next, draw a horizontal line across the face where the eyes should sit. This is key for aligning the height of both eyes (look at the drawing studies down for better understanding).
- A general rule is that the space between the eyes is roughly equal to the width of one eye. Use this to measure the distance accurately.


By breaking down the face into simple lines and shapes, you make it easier to see where everything should go, helping you avoid the dreaded wonky second eye!
2. Flip the Drawing or Use a Mirror
One of the best tricks to improve symmetry is flipping your drawing. You can do this by:
- Holding your drawing up to a mirror to see it in reverse.
- Turning your paper upside-down to get a fresh perspective.
When we stare at a drawing for too long, our eyes start to ignore small mistakes. By flipping it, you give your brain a new way of seeing it, making asymmetry jump out more clearly. This helps you catch any issues with the second eye early on.
I have previously shared an exercise where you can master symmetry by using your eyes to draw instead of your brain, check it out here: 5 Art Exercises to Boost Your Creativity (even if you’re non-artistic)
3. Use the Triangle Rule
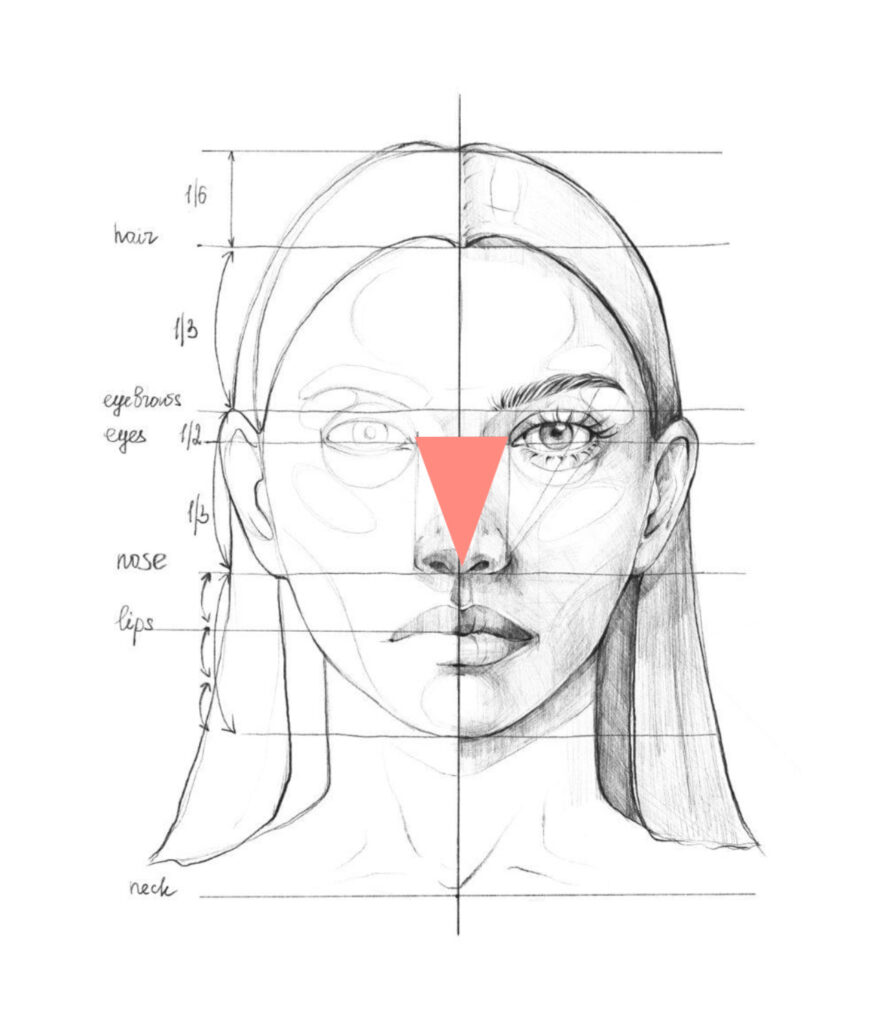
The “Triangle Rule” is a simple technique used by artists to keep facial features in proportion. Here’s how it works:
- Imagine a triangle between the two eyes and the bottom of the nose. The base of the triangle is the line between the eyes, and the point is at the bottom of the nose.
- Keeping the sides of this triangle equal helps you ensure the second eye is placed correctly and in line with the rest of the face.

This rule makes it easier to measure both distance and size, making it a go-to for achieving symmetry.
4. Practice Symmetry with Exercises
Like any other skill, drawing symmetrical eyes takes practice. Here are a few exercises to try:
- Half-Face Drawing: Start by drawing only one half of a face, and then mirror it to complete the other side. This forces you to focus on proportions and symmetry.
- Grid Drawing: Use a grid to break down the face into smaller, manageable sections. This allows you to focus on drawing one part of the face at a time, ensuring each section is symmetrical.
Consistency with these exercises will train your eye and hand coordination over time, making it easier to nail the second eye.
5. Be Patient and Start Light
Drawing the second eye doesn’t need to feel stressful. Here’s a mindset shift: think of the process as a work in progress. Professional artists take time with their portraits, often sketching lightly and adjusting as they go. Here’s how:
- Use soft strokes at first so that mistakes can be easily erased. Getting the basic structure right is more important than diving straight into details.
- Be patient with yourself. Learning how to draw the other eye is about repetition. The more you practice, the better you’ll become at noticing and correcting symmetry.
Some of my recommended tools for symmetry
- Proportional Dividers: These tools help you measure and duplicate proportions accurately.
- Grid Paper or Rulers: Great for creating guidelines and ensuring measurements are even.
- Mirror or Phone Camera: Taking a photo or using a mirror to flip your drawing is an easy way to check for symmetry.
- Drawing Mannequins: These are flat head models specifically designed for artists. The design is as accurate as possible, with consistent proportions scaled down to ensure correct head proportions, meeting industry standards.
Conclusion
Let me know if this guide was helpful or if you want any similar content targeting specific issues facing beginners. Enjoy creating <3


