Looking for a Silver Clay guide for beginners? I got you! Whether you’re a seasoned jewelry maker or a complete beginner, creating silver clay jewelry is a rewarding and creative hobby. In this guide, I’ll walk you through everything you need to know to get started with silver clay, from the material needed to the process of creating your first beautiful piece of jewelry.
Disclosure: This blog post may contain affiliate links, which means I may receive a commission if you purchase the products I recommend. While purchasing the products I recommend won’t cost you any extra money, they will help me keep this blog up and running. Thank you for your support!
What is Silver Clay?
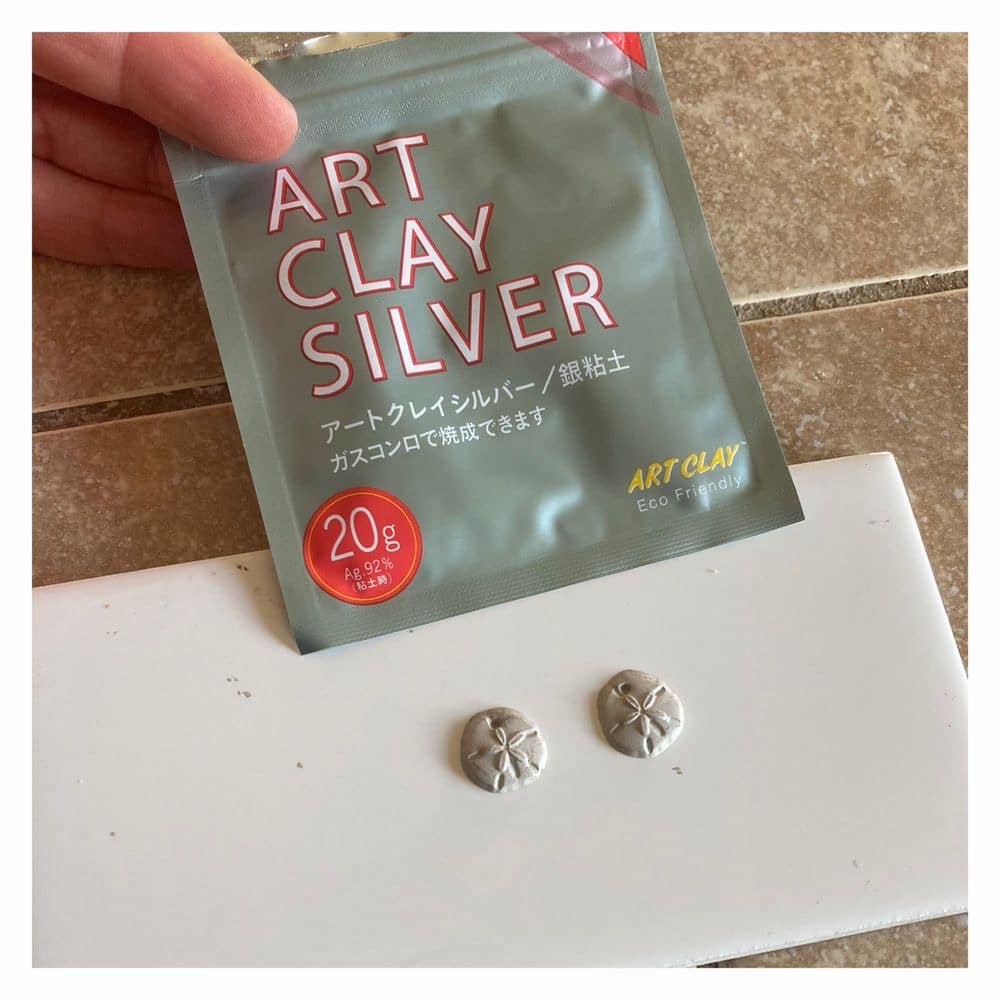
Silver clay is a type of metal clay that consists of fine silver particles mixed with a binder and water. When fired, the binder burns away, leaving behind 99.9% pure silver. This innovative material allows you to shape and form silver jewelry pieces just like working with clay, making it accessible for beginners and professionals alike.
How come you have never heard of silver clay?
Well, metal clay was first developed in Japan in the early 1990s. It quickly gained popularity for its ease of use and versatility, revolutionizing the way people create metal jewelry.
Types of Art Silver Clay :
- Lump Clay: The most common form, ideal for shaping and molding.
- Syringe: Perfect for fine details and adding embellishments.
- Paste: Used for joining pieces or creating surface decorations.
Tools and Materials Needed for Silver Clay
You can get a full silver clay kit on Amazon for all the material needed, otherwise, I will have an exhaustive list of everything you need.
To get started with Art Clay Silver, you’ll need a few basic tools and materials:
Basic Tools:
- Rolling Pin: For flattening the clay.
- Texture Mats: To add patterns and designs.
- Cutters and Molds: To shape the clay.
Essential Supplies:
- Art Clay Silver: Available in various forms.
- Work Surface: A non-stick mat or glass tile.
- Water and Brush: For smoothing and joining pieces.
Optional Tools:
- Kiln: For firing the clay, though other methods are available.
- Polishing Tools: To achieve a shiny finish.
- Decorative Elements: Such as gemstones or patinas.
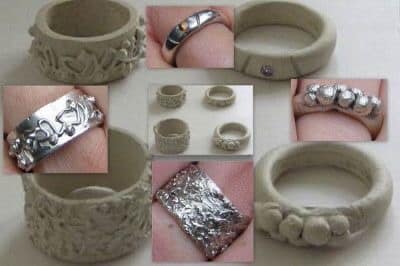
Step-by-Step Guide to Creating Your First Piece
1. Design Your Jewelry
Start by sketching your design ideas. Decide on the type of jewelry you want to create—ring, pendant, earrings, etc. Keep it simple for your first project.
2. Prepare Your Workspace
Ensure you have a clean, dry, and well-ventilated area. Gather all your tools and materials before you begin.
3. Conditioning the Clay
Condition the clay by kneading it until it’s pliable. If it feels dry, add a small amount of water. Keep the clay wrapped in plastic when not in use to prevent drying.
4. Shaping and Texturing
Roll out the clay to your desired thickness using a rolling pin. Use cutters, molds, and texture mats to shape and add designs to the clay. Be creative and experiment with different textures and patterns.
5. Drying the Clay
Once shaped, let the clay dry completely. This can be done by air drying for 24-48 hours, using a dehydrator, or placing it on a warming plate. Ensure the clay is thoroughly dry before firing to avoid cracking.
6. Firing the Clay
Different firing methods include:
- Kiln Firing: The most reliable method. Follow the manufacturer’s instructions for temperature and duration.
- Torch Firing: Suitable for smaller pieces. Heat the piece evenly until it glows orange.
- Stovetop Firing: Place the piece on a stainless steel mesh on a gas stove.
Always follow safety precautions when firing.
7. Polishing and Finishing
After firing, the piece will be white and matte. Use polishing tools to bring out the silver shine. You can also add final touches like patinas, gemstones, or other decorative elements.
Silver Clay Tips and Tricks for Beginners
- Handling the Clay: Work quickly to avoid drying. Keep unused clay wrapped tightly in plastic.
- Storage: Store leftover clay in an airtight container with a damp sponge to maintain moisture.
- Creative Ideas: Look for inspiration in nature, art, and everyday objects to personalize your jewelry.
Silver Clay Troubleshooting Common Issues
- Cracks in the Clay: Ensure the clay is thoroughly conditioned and dried. Repair small cracks with a bit of water or paste.
- Uneven Firing: Make sure the piece is evenly heated. Rotate it during torch firing.
- Polishing Problems: If the piece isn’t shining, continue polishing with finer grits or use a polishing compound.
Conclusion
Creating silver clay jewelry is an enjoyable and fulfilling hobby. With practice, you can create intricate and beautiful pieces to wear or gift. Don’t be afraid to experiment and let your creativity flow. Share your creations with a community of fellow Art Clay Silver enthusiasts, and keep pushing the boundaries of your imagination!
Additional Resources
- Tutorials and Videos: Explore online tutorials for visual guidance.
- Recommended Books: “Metal Clay Jewelry” by Louise Duhamel, “The Art of Metal Clay” by Sherri Haab.
- Classes and Workshops: Check local art centers or online platforms for classes to improve your skills.